We are pleased to announce that we have developed a Management Pack (MP) for Microsoft System Center Service Manager (SCSM), which allows you to send updates to Enterprise Alert® when a specific incident field changes.
For instance, you can automatically send updates to Enterprise Alert when the support group of an incident changes e.g. from Tier 1 to Tier 2. So whenever the support group changes in SCSM, you can automatically notify members of the new support group with Enterprise Alert.
Without this new MP it is not possible out of the box to react on the pure support group change for an incident.
In this post I will discuss how an MP can be deployed and used that monitors changes to the support group of an incident. In addition, I will also discuss how the provided MP can be modified to support updates for any incident property changes beyond the preconfigured support group.
Please note that the MP has been tested with SCSM 2012. If you would to use this solution in a different version of Service Manager, please contact Derdack support.
Deploying the support group change updates MP
An exciting new way you can use this MP is for example to open up new alerts when your incident support team changes and automatically assign these alerts to the corresponding team.
This can be done by deploying the our MP and matching up the support group name to the name of team in Enterprise Alert in your Alert Policies (support groups can be added or modified in Service Manager by navigating to Library -> Lists -> Incident Tier Queue).
In order to deploy the solution, you will need to complete the steps below.
Please note that deploying the Derdack_EA_Incident_Generic.dll file manually as described step 1 will become unnecessary in the next Enterprise Alert patch (the current version is 5.2.1 at the time of writing this post) and can then be done with the System Center Management Pack Components setup. The same will then apply to creating the event parameter AutomationTasks as specified in step 3.
Step 1: Deploying the Derdack_EA_Incident_Generic.dll file
- Download the file from https://downloads.enterprisealert.com/EnterpriseAlert/Misc/SCSM/Derdack.EnterpriseAlert.SupportGroupChange.zip and unzip the contents.
- Copy the Derdack_EA_Incident_Generic.dll file to the desktop of the SCSM server (you cannot copy it directly to the SCSM installation folder in your VM, because you need Administrator rights).
- Copy the file from the desktop to the installation folder of SCSM, typically “C:Program FilesMicrosoft System Center 2012Service Manager”.
Step 2: Deploying the Derdack.EnterpriseAlert.SupportGroupChange.xml Management Pack
- Download the file from https://downloads.enterprisealert.com/EnterpriseAlert/Misc/SCSM/Derdack.EnterpriseAlert.SupportGroupChange.zip and unzip the contents if you have not done so already.
- Open the Service Manager Console.
- Navigate to Administration -> Management Packs.
- Click Import under Tasks and select the Derdack.EnterpriseAlert.SupportGroupChange.xml file.
Step 3: Create an Alert Policy in Enterprise Alert
- Select Alerts -> Alert Policies -> Create New in the Web portal.
- Select “System Center Server Manager” as Event Source, enter in the policy details on the General tab and click Next.
- Select “Add Condition” to open up the event parameter condition dialog.
- Select “<<Create New Parameter>>”, enter in “AutomationTasks” as the new parameter name and press Return.
- Select “equals” for “Type of condition”.
- Enter in “;SupportGroupChange;” for “Value to match” and click OK.
- Complete the rest of the Alert Policy details.
Step 4: Testing the solution
- Create a new incident in Service Manager.
- Wait for a new alert or new event from Service Manager to be automatically generated in Enterprise Alert. This should take no more than a minute.
- Update the support group of the incident in Service Manager.
- A new alert will be created according to the Alert Policy you created in step 3. Again, this should take no more than a minute.
Please note that the support group for an incident is currently named “Tier Queue” in Enterprise Alert and you will need to select this event parameter if you would like to reference it in your alert message.
In addition, please note that the policy created in step 3 will only trigger if the alert has already been forwarded to Enterprise Alert. This should automatically be done each time an alert is created. The policy will also trigger even if the incident status in Service Manager is “Resolved” or “Closed”. This makes sense when the support group is changed before reactivating the incident.
Behind the scenes: how the MP is designed
Now, what may be of interest to you is that you are not restricted to updates from Service Manager for only the support group property i.e. you can easily customize the MP that we provide to send updates to Enterprise Alert for other incident properties as well! This opens up a whole new dimension for integrating Enterprise Alert with your business workflows.
To give you a basic example, say the urgency of the incident has increased from low to high and you would like to automatically send out a high priority alert via Enterprise Alert when the urgency changes, you can do this by deploying a customized MP, that listens for such changes. I will go through the steps that are needed to customize the MP below. You can then adapt these steps to suit your workflow requirements.
- Download the file from https://downloads.enterprisealert.com/EnterpriseAlert/Misc/SCSM/Derdack.EnterpriseAlert.SupportGroupChange.zip and unzip the contents if you have not done so already.
- Rename the file to Derdack.EnterpriseAlert.UrgencyChange.xml and open it in your favorite XML editor.
- Rename all 8 instances of SupportGroup to Urgency in the document. Do the same for the 2 occurrences of “Support Group”.
- Change the text of the Version element to 1.0.0.0 since this is the first time we will be importing the MP. Any changes made to the MP afterwards will require incrementing the version number, deleting the old MP via the SM console and reimporting it. Not incrementing the version number may result in Service Manager using an older version of the MP, even though a newer version of the MP has been imported.
- Find out the name of the property in SCSM that you would like to monitor changes for i.e. you need to find out what the name of the property is that SCSM uses under the hood and not the name of the property as displayed in the SCSM console.
You can do this by using one the following methods:a) Browsing the Incident class in the SCSM Authoring Tool: open the Authoring Tool, create a new MP, select View -> Class Browser, select “All Management Packs” and then select the Incident class for inspection.b) If however, you do not want to go through the process of installing the authoring tool (whose setup is over a gig), you can take a look at the column names specified in the MT_System$WorkItem$Incident table in the ServiceManager database. This would be an unofficial method and subject to changes by Microsoft.
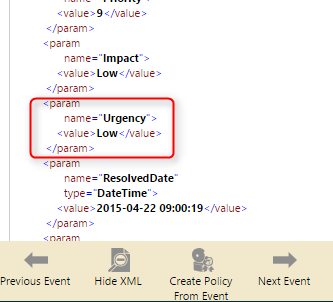
c) Alternatively, if you simply want to monitor changes on the most common properties, you can use the parameter name that Enterprise Alert uses since the parameter names typically do match up. Enterprise Alert would first had to have received some incident events from SCSM though for you to take a look at. You can see the parameter names by going to Alerts -> Incoming Events in the Web portal, selecting the SCSM incident event and clicking on View XML:
- In our case, the name of the property is Urgency. Replace 4 instances of TierQueue$ with Urgency$ and save the XML file.
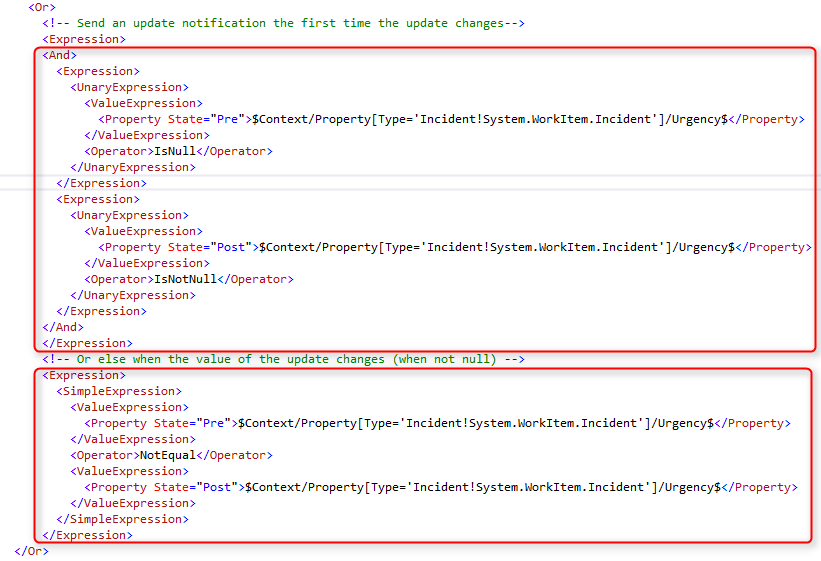
For the more technical minded, you may have noticed that there are 2 expression groups specified in the MP as follows:
The first expression group is used to monitor for changes for when the property’s value is first set (i.e. when the value is blank and is then filled) and the second group monitors for changes where the property’s existing value changes. Unfortunately, this is necessary, otherwise an update is not sent when a value is initially changes from a blank value.
That’s all there is to creating a new MP! Now you can import the new MP and updates should be sent as soon as the property changes. To trigger alerts for these updates, you will simply need to create an Alert Policy that triggers when the AutomationTasks parameter contains the text “UrgencyChange”.
If anything is unclear, please don’t hesitate to comment!

